
Stokke Tripp Trapp High Chair: A Comprehensive Assembly Guide (Updated 02/06/2026)
This guide details assembling the iconic Stokke Tripp Trapp, from initial frame setup to adapting it for various ages, ensuring safety and comfort.
The Stokke Tripp Trapp is renowned as a timeless and adaptable high chair, designed to grow with your child from birth through adulthood. This chair isn’t just a feeding seat; it’s an ergonomic haven promoting good posture and fostering a sense of belonging at the family table.
Its adjustable design allows for customized comfort at every stage, seamlessly transitioning from a newborn setup with the Baby Set to a toddler chair and eventually, a comfortable seat for older children and even adults. Understanding its versatility is key to maximizing its lifespan and value. This guide will walk you through each step, referencing official Stokke resources and helpful video tutorials for a smooth assembly process.
Understanding the Components
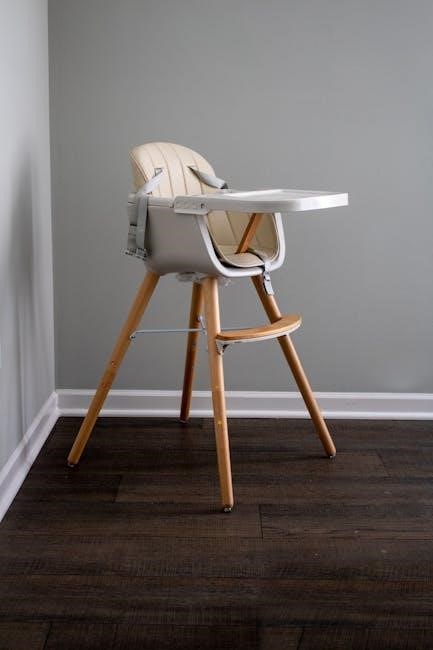
Before beginning assembly, familiarize yourself with all parts. The core components include the chair frame, seat, backrest (with curved options), and footrest. You’ll also find metal screws and nuts – typically 10 screws and 6 nuts – and an Allen key for tightening.
If you’ve purchased the Baby Set, this includes its own separate components designed for infant support. The Extended Glider (V2-V3) is an optional accessory for added stability. Carefully inventory all pieces against the parts list in your instruction manual to ensure everything is present before you start. Knowing each component’s purpose streamlines the assembly process.

Assembly Process: Step-by-Step Instructions
Follow these detailed steps for a secure and correct assembly. We’ll guide you through each stage, from the initial frame to final adjustments, ensuring a safe chair.
Step 1: Frame Assembly ⏤ Initial Setup
Begin by unpacking all components and verifying against the parts list. Locate the four legs and connect them using the provided metal screws and nuts – typically requiring the Allen key. Ensure each screw is initially hand-tightened before fully securing.
Pay close attention to the leg orientation; they are designed to fit a specific way. Once the legs are attached, carefully flip the frame upright. Double-check all connections for stability. This initial setup forms the foundation for the entire chair, so accuracy is crucial. Refer to the official Stokke manual for detailed diagrams if needed.
Step 2: Attaching the Seat
With the frame stable, proceed to attach the seat. Align the seat with the pre-drilled holes on the frame’s side supports. Utilize the remaining metal screws and nuts, again employing the Allen key for tightening. Ensure the seat is firmly secured, as it directly supports the child.
Check for any wobble or instability; tighten screws as needed. The seat’s positioning is vital for proper posture and comfort. Remember to avoid over-tightening, which could damage the wood. Consult the Stokke instruction manual for visual guidance on correct seat alignment and fastening techniques.
Step 3: Backrest Installation – Curved Backrest Options
Now, install the backrest, choosing between the two curved backrest options provided; Align the chosen backrest with the designated slots on the seat; Secure it using the appropriate screws and nuts, tightening with the Allen key. Ensure a snug fit, providing adequate support for the child’s back.
The backrest angle contributes to comfort and posture. Experiment with slight adjustments to find the optimal position. Refer to the Stokke manual for detailed diagrams illustrating the correct backrest installation and available angle options. Double-check all connections for stability before proceeding.
Step 4: Footrest Attachment & Adjustment
Attach the footrest to the chair frame, ensuring it clicks securely into place. The footrest provides essential support and stability as your child grows. It’s a crucial element for proper posture and comfort during mealtimes.
The Tripp Trapp’s footrest is adjustable, allowing you to customize the chair’s depth to accommodate your child’s size. Adjust the footrest position as needed, ensuring their feet are comfortably supported and not dangling. This adjustment is vital for long-term ergonomic support. Refer to the manual for specific adjustment guidelines.
Tripp Trapp Baby Set Installation
The Baby Set transforms the Tripp Trapp into a safe, secure high chair for newborns, offering optimal support and bringing your baby closer to the table.
Understanding the Baby Set Components
The Stokke Tripp Trapp Baby Set comprises several key components designed for infant comfort and security. These include the seat itself, featuring a molded design to support your baby’s back and posture. A crucial element is the five-point harness, ensuring a secure and adjustable fit as your child grows.
You’ll also find the crotch post, which is integral to the harness system, and adjustable footrests to accommodate different leg lengths. Pay attention to the height adjustment mechanism, allowing you to raise or lower the seat to match your baby’s developmental stage. The Baby Set is designed to fit seamlessly with the existing Tripp Trapp chair frame, creating a complete and functional high chair solution.
Step 5: Installing the Baby Set – Secure Attachment
Begin by ensuring the Tripp Trapp chair frame is correctly assembled and stable. Carefully position the Baby Set onto the chair, aligning the attachment points. Gently lower the seat until it clicks securely into place – a distinct audible click confirms proper installation.
Double-check the attachment by applying gentle downward pressure. Next, install the crotch post, ensuring it’s firmly connected. Finally, thread the five-point harness straps through the designated slots in the Baby Set. Always verify the harness buckles are functioning correctly before each use, guaranteeing a safe and secure seating environment for your little one.
Step 6: Adjusting the Baby Set for Newborns
For newborns, prioritize a reclined and supportive position within the Baby Set. Adjust the backrest to its most reclined setting, providing optimal head and spinal support. Ensure the crotch post is positioned correctly to maintain a secure and comfortable fit.
The Baby Set should allow approximately 4-5 cm (1-2 inches) of space between the baby and the chair’s backrest initially, increasing to 10 cm (3.9 inches) as the child grows. Regularly check these adjustments to accommodate your baby’s development, ensuring continued safety and comfort throughout their early months.

Safety Features and Adjustments
Proper harness installation, height, depth, and angle adjustments are crucial for a secure and comfortable fit as your child grows with the Tripp Trapp.
Step 7: Harness Installation and Usage
Ensuring your child’s safety is paramount. Begin by carefully attaching the Stokke harness straps to the designated slots on the Tripp Trapp chair. Double-check that the straps are securely fastened and aren’t twisted. Adjust the harness to fit snugly, allowing no more than one finger’s width between the strap and your child’s body.
Always use the harness when your child is seated, even for brief periods. Regularly inspect the harness for wear and tear, replacing it if any damage is detected. Remember, the harness is a restraint system and should not be relied upon as a substitute for constant adult supervision. Proper usage significantly enhances the chair’s safety profile.
Step 8: Height and Depth Adjustments – Growing with Your Child
The Tripp Trapp’s adaptability is key to its longevity. To adjust the seat height, loosen the bolts on the chair’s legs and reposition the seat to the desired level; Ensure all bolts are tightened securely after adjustment. Similarly, the seat depth can be altered to accommodate your child’s growing size.
Adjusting both height and depth is crucial for proper posture and comfort. As your child grows, regularly modify these settings to maintain optimal support. These adjustments allow the chair to transition seamlessly from a high chair for infants to a comfortable seat for older children and even adults.
Step 9: Angle Adjustments for Optimal Comfort
While the standard Tripp Trapp doesn’t offer extensive angle adjustments, utilizing the Baby Set introduces this crucial feature. When the Baby Set is installed, its backrest angle can be modified to provide optimal support for newborns and infants. This ensures a safe and comfortable recline for younger children.
Proper angle adjustment is vital for digestive health and preventing slouching. As your baby develops, gradually adjust the angle to a more upright position. Regularly check the Baby Set’s secure attachment and ensure the angle remains appropriate for your child’s developmental stage, maximizing comfort and safety.

Advanced Configurations & Accessories
Explore options like the Extended Glider (V2-V3) and cushions to personalize your Tripp Trapp, enhancing comfort and functionality for all ages.
Step 10: Extended Glider Assembly (V2-V3) – If Applicable
If your Stokke Tripp Trapp includes the Extended Glider (versions V2 or V3), this step details its attachment. The glider allows for a rocking motion, providing added comfort for your little one. Begin by identifying the glider components and ensuring you have the necessary screws and Allen key.
Carefully align the glider rails with the designated slots on the chair’s legs. Securely fasten the glider using the provided metal screws and nuts, tightening them with the Allen key. Ensure a snug fit, but avoid over-tightening, which could damage the wood. Double-check stability before use. This accessory transforms the chair, offering a soothing experience.
Step 11: Cushion Installation & Care
Enhance your child’s comfort with a Tripp Trapp cushion! Installation is simple: place the cushion directly onto the seat, ensuring a snug and secure fit. Cushions come in various colors and materials to match your décor and child’s preferences.
For care, regularly vacuum the cushion to remove crumbs and debris. Most cushions have removable, machine-washable covers – check the care label for specific instructions. Avoid harsh detergents or bleach. Air drying is recommended to prevent shrinkage. Proper cushion maintenance extends its lifespan and keeps it hygienic for your little one’s enjoyment.

Troubleshooting Common Assembly Issues
Addressing screw tightening and backrest instability is key. Consult the manual for proper torque and ensure all parts are securely connected for safe use.
Step 12: Addressing Screw and Nut Tightening
Ensuring proper screw and nut tightness is paramount for the Tripp Trapp’s stability and your child’s safety. Begin by verifying you’re using the correct screws (identified as Part 10) and nuts (Part 6) as outlined in the official Stokke manual. Use the provided Allen key to tighten each fastener, but avoid over-tightening, which can strip the threads or damage the wood.
A common issue is insufficient tightening, leading to wobbling. Systematically check each connection point – frame joints, seat attachment, backrest, and footrest. If screws feel loose despite tightening, double-check the alignment of the components. Refer to online video tutorials for visual guidance on correct assembly techniques. Regularly re-tighten screws as part of routine maintenance.
Step 13: Dealing with Backrest Instability
Backrest instability often stems from improperly secured screws or mismatched backrest components. The Tripp Trapp offers curved backrest options; ensure the chosen backrest (Part 2) is correctly aligned with the frame. Begin by loosening the screws attaching the backrest, then re-seat it firmly, ensuring a flush fit against the frame.
Retighten the screws, applying even pressure. If instability persists, inspect the screw holes for wear or damage. Consult the Stokke instruction manual for diagrams illustrating correct backrest installation. Online resources, like YouTube tutorials, can provide visual assistance. A wobbly backrest compromises safety; address it immediately.
Maintenance and Care
Regular cleaning and proper storage are vital for longevity. Wipe down surfaces, inspect screws periodically, and follow storage guidelines to preserve your Tripp Trapp.
Step 14: Cleaning Instructions for the Tripp Trapp
Maintaining a hygienic Tripp Trapp is simple with regular cleaning. For the wooden components, a damp cloth with mild soap is generally sufficient; avoid harsh chemicals or abrasive cleaners that could damage the finish. The plastic parts can be washed with warm, soapy water.
Pay close attention to crevices and areas where food particles may accumulate. For stubborn stains, a gentle scrubbing brush can be used. Ensure all cleaning solutions are thoroughly rinsed off and the chair is completely dry before use. Cushions, if applicable, should be cleaned according to the manufacturer’s instructions – often involving spot cleaning or gentle machine washing.
Regular wiping down after each use will prevent buildup and maintain the chair’s appearance.
Step 15: Long-Term Storage Guidelines
When storing your Stokke Tripp Trapp for extended periods, proper preparation is key. Before disassembly, thoroughly clean the chair as outlined in the previous section to prevent mold or mildew.
Disassemble the chair as much as possible, storing all screws, nuts, and the Allen key in a labeled bag to prevent loss. Store the wooden components in a dry, climate-controlled environment, away from direct sunlight and extreme temperatures.
Avoid stacking heavy items on top of the chair parts, which could cause damage. Consider covering the disassembled pieces with a breathable cloth to protect them from dust.
Transitioning Through Stages
The Tripp Trapp adapts as your child grows, from utilizing the Baby Set to toddler and adult configurations, ensuring years of comfortable use.
Step 16: From Baby Set to Toddler Configuration
Transitioning from the Baby Set is straightforward. Remove the Baby Set, ensuring all straps are detached and the unit lifts cleanly from the chair frame. Adjust the seat depth and height to accommodate your growing toddler; this is crucial for proper posture and comfort.
The footrest should also be adjusted to provide support as their legs lengthen. Remember, the Tripp Trapp is designed to grow with your child, so frequent adjustments are key. Ensure all screws and nuts are tightened securely after each adjustment. Refer to the official Stokke manual for detailed diagrams illustrating optimal settings for different ages and sizes. This ensures a safe and comfortable dining experience for your little one.
Step 17: Adapting the Chair for Older Children & Adults
The Tripp Trapp’s versatility extends beyond toddlerhood. Continue adjusting the seat height and depth as your child grows, allowing them to use the chair comfortably well into their teens and even adulthood! Maximize the seat height for older children and adults, providing a standard chair height for dining or work.
The footrest remains essential for leg support at any age. Regularly check and tighten all connections to maintain stability. Consider adding a cushion for enhanced comfort during extended use. The chair’s robust design ensures it can support users of varying sizes, making it a long-lasting investment.

Resources and Support
Access the official Stokke manual and explore online video tutorials for assistance with assembly, adjustments, and troubleshooting your Tripp Trapp chair.
Step 18: Accessing the Official Stokke Instruction Manual
The official Stokke instruction manual is your primary resource for detailed diagrams and specifications crucial for a safe and correct assembly. It provides a comprehensive overview of all components, including the frame, seat, backrest, and optional accessories like the Baby Set and Extended Glider.
Locate the manual either within the product packaging upon delivery or download a digital version directly from the Stokke website. The manual outlines each step of the assembly process, ensuring you understand proper screw tightening and component alignment. Refer to it frequently throughout the assembly, and keep it readily available for future adjustments or disassembly. It’s essential for understanding the chair’s full functionality and safety features.
Step 19: Online Video Tutorials & Support Forums
Supplementing the official manual, numerous online resources offer visual guidance and community support for assembling your Stokke Tripp Trapp. Platforms like YouTube host step-by-step video tutorials, demonstrating the entire assembly process from unboxing to final adjustments. Search for “Stokke Tripp Trapp Setup Guide” or “Handy Stokke Trapp Tripp Instructions” to find helpful videos.
Additionally, online support forums and communities dedicated to Stokke products provide a space to ask questions, share experiences, and troubleshoot common issues. These forums often feature experienced users who can offer valuable advice and solutions. Utilize these resources to enhance your understanding and ensure a smooth assembly experience.